
My first attempt at this sword came off the bed looking like someone had stretched the sprite in an image editor and forgotten to hold shift. The blade was long enough, but every single pixel was a tall, loose rectangle with daylight shining through the centre holes. Traditional corner-to-corner uses standard treble crochets. For a stripey gradient blanket, trebles are fine. For 8-bit pixel art, they are an absolute disaster.
The fix is simple: drop down to UK half trebles and shorten your starting chains. That single swap turns floppy blocks into dense, neat squares that measure identically in both directions. Because an 8-bit sword blade naturally sits at a forty-five-degree angle, its longest edges travel right along the diagonal working rows of C2C. You spend very little time fighting stepped jog-lines through the steel; the design works with the bias instead of fighting it.
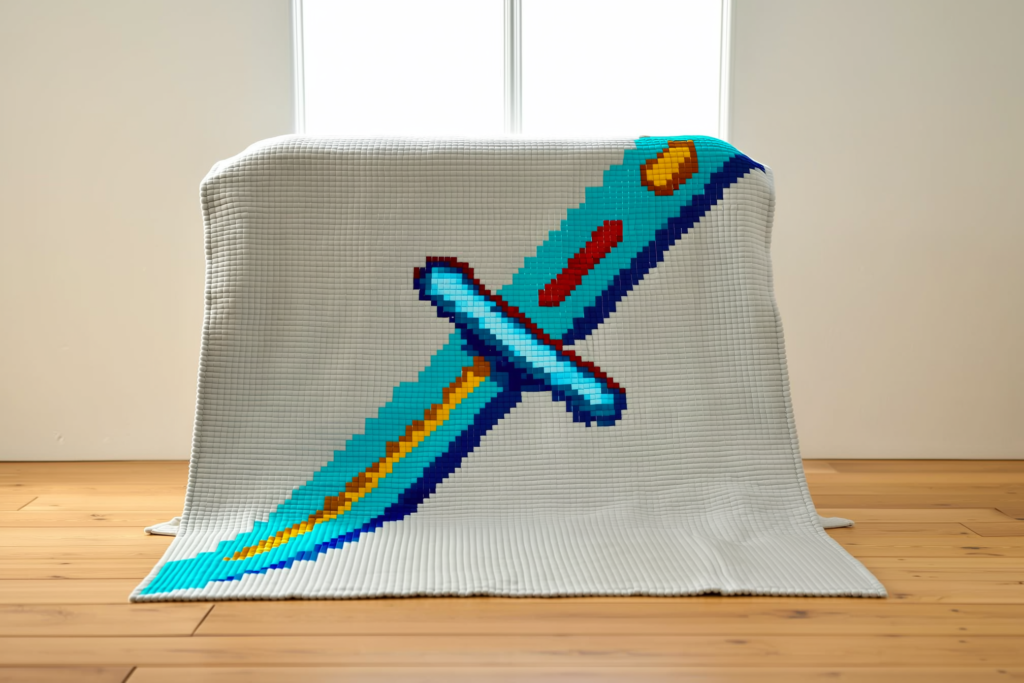
What you will make
- A cot-sized pixel blanket measuring roughly 85 cm by 110 cm, featuring an 8-bit sword angled corner-to-corner across a pale grey field.
- Worked in diagonal corner-to-corner (C2C) using UK half treble blocks (mini-C2C) across a grid of 52 tiles wide by 68 tiles long.
- Skill level is intermediate: the stitch mechanics are dead simple, but managing six yarn sources across colour changes requires patience.
- Expect around 22 to 28 hours of hook time, plus an evening to sew in the yarn tails.
What you need
- DK acrylic yarn in Pale Grey (background): approximately 550 g to 600 g.
- DK acrylic in Midnight Navy (outer blade and guard outline): roughly 120 g.
- DK acrylic in Bright Cyan (blade core): roughly 80 g.
- DK acrylic in White (blade edge highlight): roughly 40 g.
- DK acrylic in Warm Gold (crossguard and pommel accent): roughly 30 g.
- DK acrylic in Chestnut Brown (grip): roughly 30 g.
- 4.0 mm (UK 8, US G-6) crochet hook.
- Yarn bobbins or large plastic clothes pegs to hold small yarn bundles.
- Blunt tapestry needle for sewing ends as you go.
How to make it
1. Mastering the UK Half Treble Tile
Traditional C2C uses six chains to start a row and three trebles per block. Throw that formula out for this piece. We are using UK half treble crochet (htr) to keep our aspect ratio 1:1. To start your very first tile: chain 4. Work 1 htr into the 3rd chain from your hook, then 1 htr into the 4th chain. That is tile one finished.
To start any subsequent increase row, chain 4, work 1 htr into the 3rd chain from the hook, and 1 htr into the 4th chain. Turn your work. To join this new tile to the adjacent block from the previous row, slip stitch into the chain-2 space of that previous block. Chain 2, then work 2 htr directly into that same chain-2 space. That forms your standard mini-C2C block. It is tighter, denser, and actually square.
2. Tension Swatch and Chart Orientation
Work a small sample piece of 6 tiles by 6 tiles using your background grey. Flatten it out on a table without pulling. Your swatch must measure roughly 10 cm by 10 cm, which gives an individual tile size of approximately 1.65 cm square. If your tiles measure 1.65 cm wide but 2.1 cm tall, you are either pulling your chains too loose or lifting your hook too high during the half trebles. Adjust until the width and height match.
Orient your 52 by 68 tile grid so the sword’s pommel sits near the bottom-left corner and the point reaches toward the top-right corner. Row 1 begins in the lower-left corner (grey field). The first colour change happens at row 9, where the deep navy outline of the pommel enters the frame.
3. Setting Up Bobbins for the Hilt and Guard
Never carry your dark outline yarn across the back of the pale grey background. It will show through on the front every single time. Instead, wind separate 10-metre lengths of yarn onto plastic clothes pegs or bobbins. When you hit row 14, where the brown grip and gold pommel details run alongside the navy outline, you will have five active yarn strands hanging from the working edge.
Clip the bobbins to the blanket fabric when you reach the end of a row. When you turn your work, always turn it back and forth like turning the page of a book, then turning it back. Never spin the blanket in full continuous circles, or you will create a rope of tangled yarn in under three rows.
4. Managing the Increase Rows (Rows 1 to 52)
You are adding one tile to every row on both sides until row 52. When changing colour at the start of a block, complete the final yarn-over-pull-through of the slip stitch using the new colour. Do not change colours during the half treble stitches; change on the slip stitch so the loop sitting on your hook is already the colour of the new tile’s chain.
Rows 28 through 46 build the widest section of the crossguard. The navy outline sandwiches the gold crossguard blocks and the cyan start of the blade. Drop unused colours to the wrong side of the work. If a colour is needed only three tiles away on the next diagonal pass, leave it hanging and pick it up when you return.
5. Working the Uneven Rectangle Decreases (Rows 53 to 68)
At row 53, you reach the width limit of 52 tiles. You must now decrease on the right-hand edge while continuing to increase on the left-hand edge. To decrease: at the end of row 52, do not chain 4. Turn your work, slip stitch across the top of the two htr stitches you just made, and slip stitch directly into the chain-2 space. Chain 2, work 2 htr, and proceed as normal.
The blade runs continuously through this section. The white highlight occupies the upper edge of the blade, backed by cyan in the centre, enclosed by navy at the bottom. Because the sword sits on the bias, the blade edges run in unbroken vertical lines of single-colour tiles for several rows at a time, making this the fastest section to hook.
6. Closing the Top Corner (Rows 69 to 119)
Row 69 marks the length limit of 68 tiles. From this point forward, you decrease on both edges every single row. The sword’s diamond tip finishes around row 94. After the tip is capped in navy outline, the remaining 25 rows are worked entirely in pale grey.
Keep your edge slip stitches relaxed on these final decrease rows. If you pull your slip stitches tight when travelling across the edge of the finished tiles, that entire corner will curl inward like a bowl. Finish row 119 with a single tile, slip stitch to lock it, and cut the working yarn with a 15 cm tail.
Tips to get it right
- Change colours during the slip stitch that anchors into the chain-2 space, never on the half treble stitches themselves; this prevents the old colour from bleeding into the top loop of the new tile.
- Work over your yarn tails for three stitches, then leave the tail hanging and finish securing it with a needle later; working over tails alone is not enough to stop acrylic ends from poking out after washing.
- Assign a ‘public’ and ‘private’ side early by placing a locking stitch marker on row 1 of the front; always drop non-working yarn strands towards the private side.
- Clip pegs or bobbins directly to the edge of the blanket fabric before flipping your work so the weights do not swing and pull your tension uneven.
What goes wrong
Tiles come out tall and rectangular, stretching the pixel blade out of proportion. You are likely using UK trebles (US double crochet) or pulling your chain-2 turning loops too tall. Switch strictly to UK half trebles (chain 4 to start, chain 2 to join) and check that your tile width equals its height on a flat surface.
Dark outline yarn shows as a dark shadow behind the pale grey background. You carried the navy yarn across the back behind pale tiles instead of dropping it. Cut the float, fasten off the carried thread, and introduce a separate bobbin for the dark section on the other side.
The blanket edges are wavy and do not lie straight along the perimeter. Your turning chains on increase rows are too loose compared to your slip-stitch decreases. Make sure your starting chain-4 is worked with firm tension, and do not yank the slip stitches tight on decrease rows.
Finishing
Darning the tails on a multi-colour C2C blanket is half the battle. Use a blunt metal tapestry needle and weave each tail back into tiles of its own colour. Run the thread through the base of the half trebles in one direction, split the plies slightly on the return pass, and work through a third time in reverse. Acrylic yarn has a slippery memory; two passes will work loose in the wash, but three passes will not.
Once the tails are buried, wet blocking will not do much for 100% acrylic. Pin the blanket out to square dimensions on foam mats, holding the edges straight with rustproof pins every 5 cm. Hold a steam iron roughly 3 cm above the surface, letting the steam penetrate the acrylic fibres without ever letting the metal plate touch the yarn. The steam relaxes the acrylic and locks your square tiles into flat, permanent alignment. Finish with a plain round of UK double crochet in pale grey around the entire perimeter, working 2 double crochets into the side of each tile and (1 dc, ch 2, 1 dc) into each corner.

Leave a Reply